| 일 | 월 | 화 | 수 | 목 | 금 | 토 |
|---|---|---|---|---|---|---|
| 1 | 2 | 3 | 4 | 5 | 6 | 7 |
| 8 | 9 | 10 | 11 | 12 | 13 | 14 |
| 15 | 16 | 17 | 18 | 19 | 20 | 21 |
| 22 | 23 | 24 | 25 | 26 | 27 | 28 |
- gradle
- ozd
- socket-client
- Galaxy Watch
- Flavors
- OZViewer
- mqtt
- 오즈뷰어
- Java8
- Android
- socket-server
- BottomSheetDialog
- firebase-storage
- Kotlin
- mosquitto
- Dva
- socket.io
- google-login
- firebase-database
- TIZEN
- JNI
- hung-up
- ActivityResult-API
- AWS
- 워치
- git-push
- Firebase
- NoSuchMethodError
- cloud-firestore
- git
- Today
- Total
Hyeyeon blog
[Android] Firebase Google Login 연동하기 본문

1.Firebase 설정
1-1. Firebase Console에서 프로젝트 생성 후, Authencation에서 시작하기를 클릭합니다.
프로젝트 생성 시 SHA-1은 Android Studio에서 Gradle > Tasks > android > signingReport 를 실행하면 콘솔에서 확인할 수 있습니다.

1-2. 로그인 제공 업체 목록에서 Google을 선택합니다.

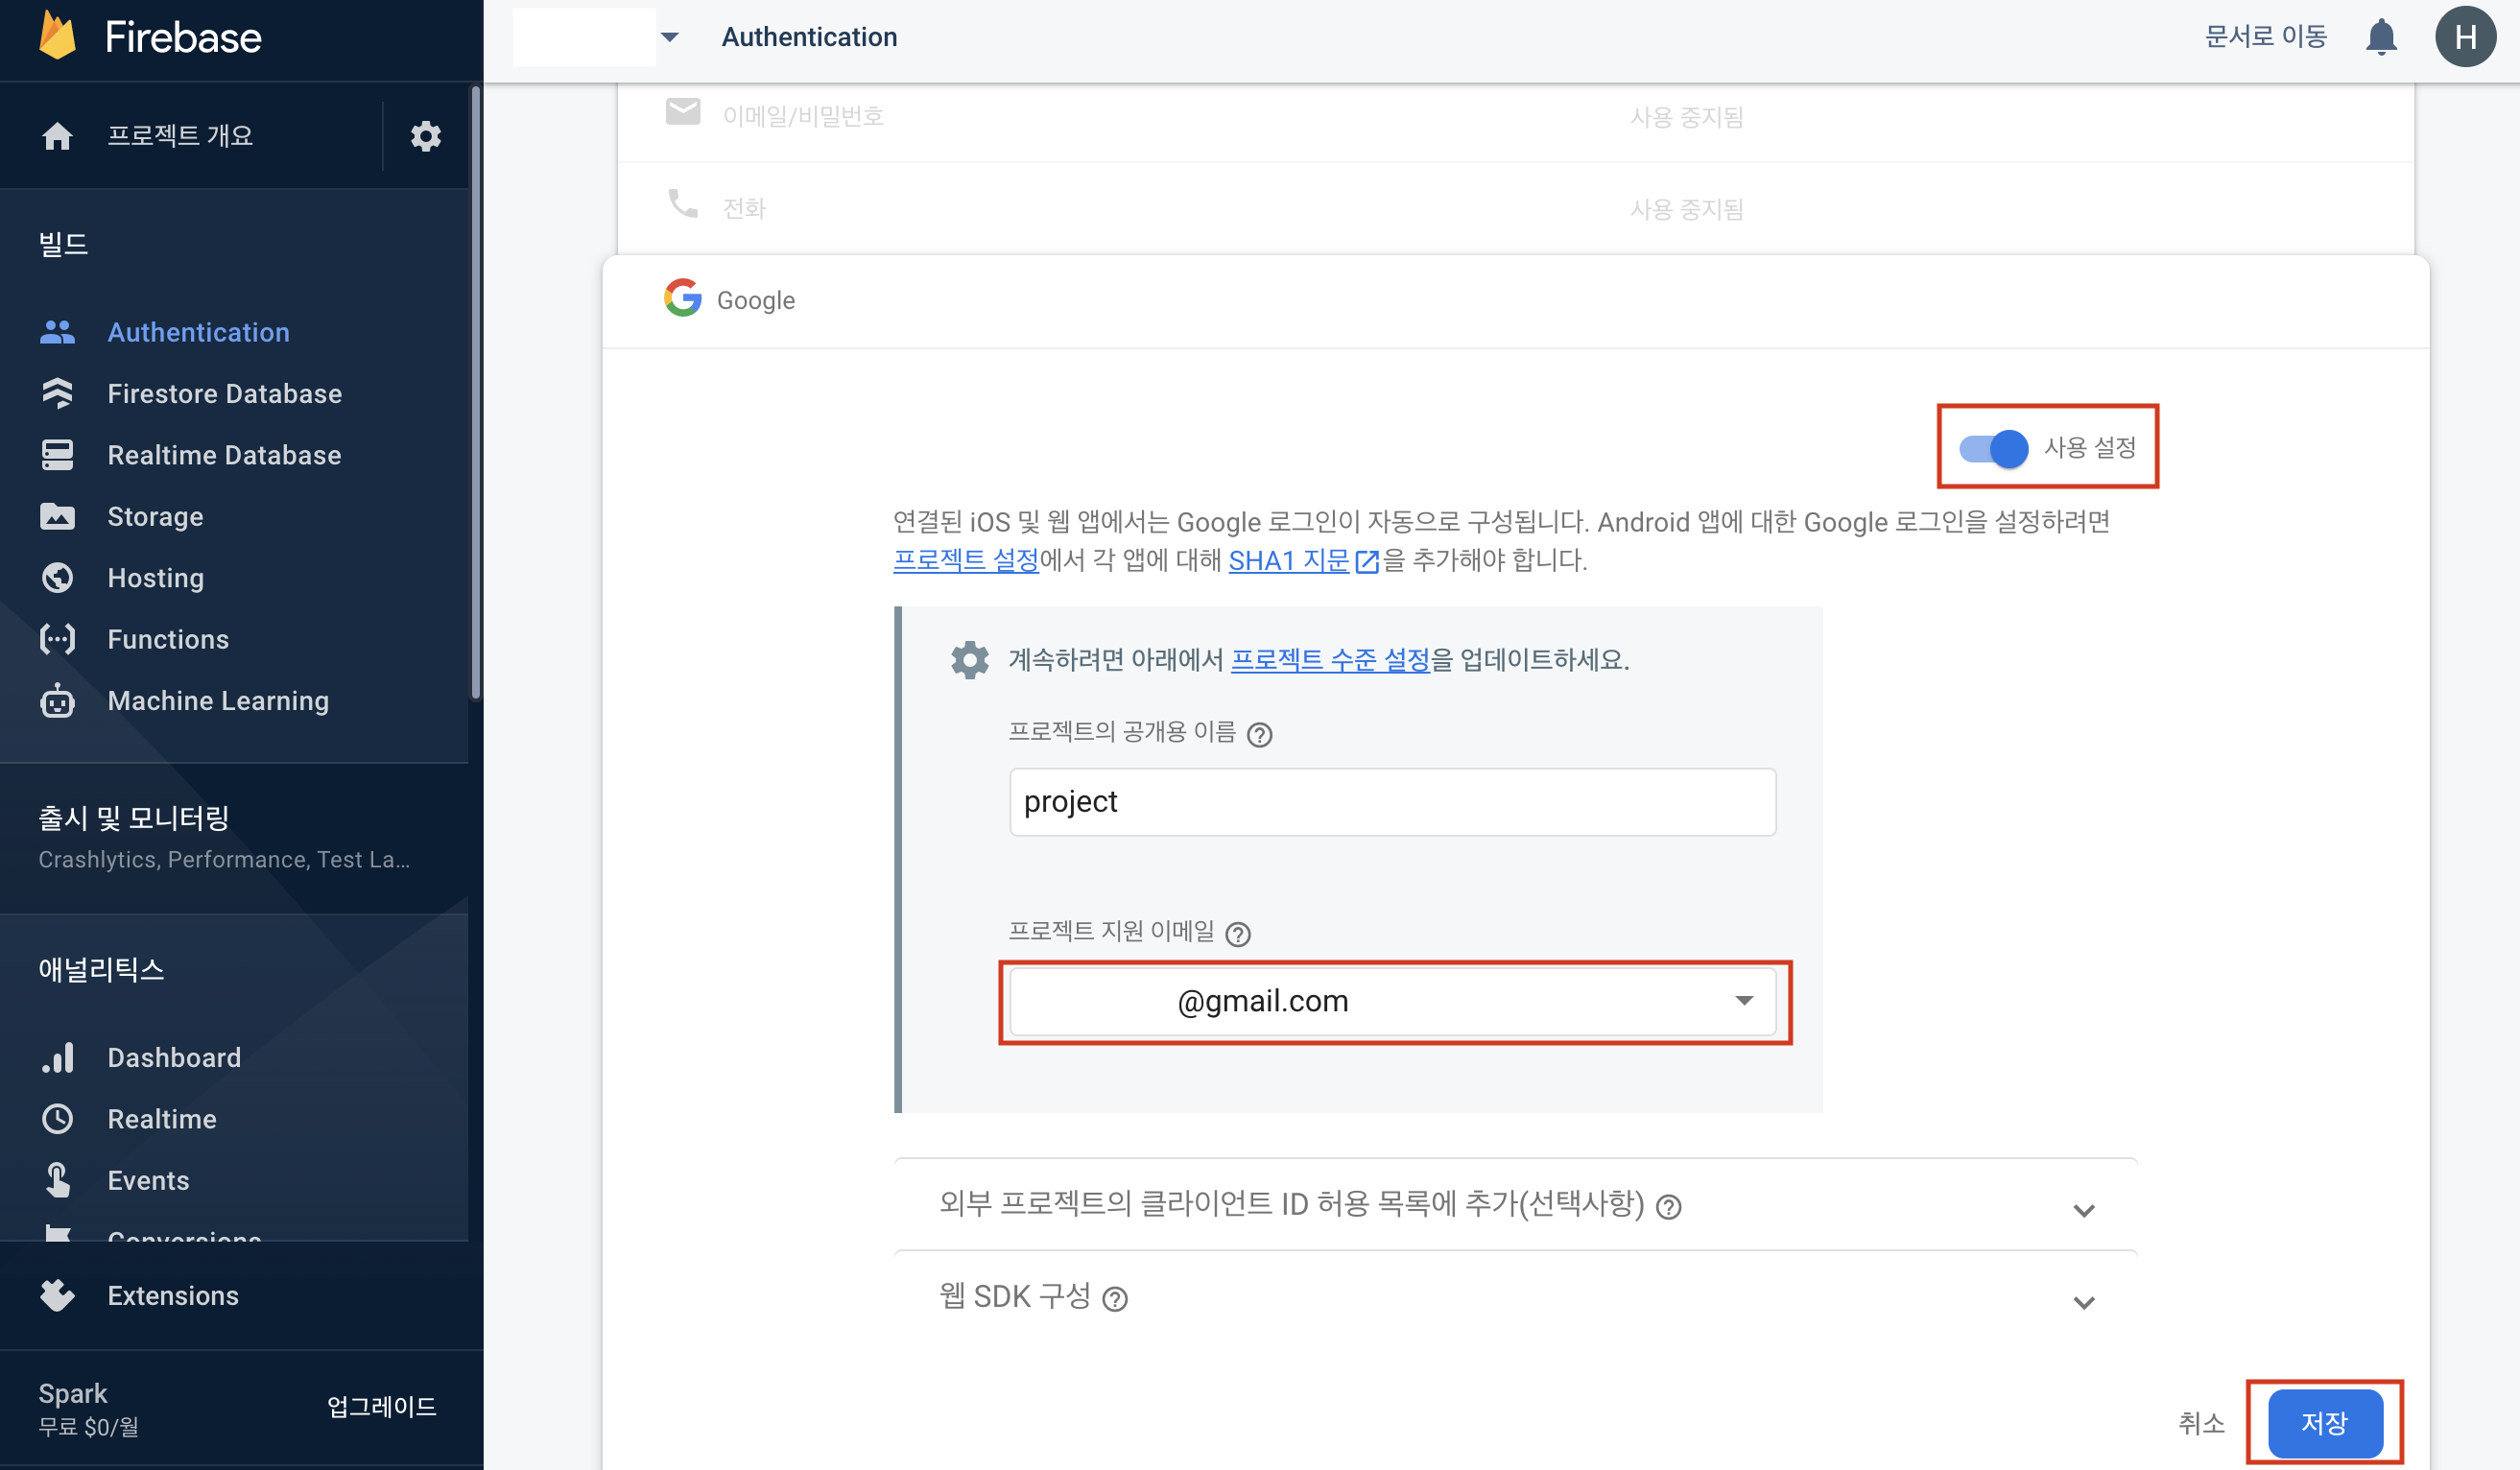
1-2. 사용 설정을 활성화 시킨 후, 프로젝트 지원 이메일을 선택하고 저장을 클릭합니다.

2. Android 프로젝트 설정
2-1. build.gradle(Project)
buildscript {
    repositories {
        google()
    }
    dependencies {
        classpath 'com.google.gms:google-services:4.3.5'
    }
}

allprojects {
    repositories {
        google()
    }
}
2-2. build.gradle(Module)
apply plugin: 'com.google.gms.google-services'
dependencies {
    implementation platform('com.google.firebase:firebase-bom:27.1.0')
    implementation 'com.google.firebase:firebase-auth:21.0.0'
    implementation 'com.google.android.gms:play-services-auth:19.0.0'
}
3. GoogleSignInButton View 추가
기본 제공 UI 버튼을 사용할 경우, xml에 아래와 같이 추가합니다.
 <com.google.android.gms.common.SignInButton
    android:id="@+id/login_button"
    android:layout_width="match_parent"
    android:layout_height="wrap_content" />
4. 로그인 연동
4-1. Google에 로그인하여 token를 가져옵니다.
private lateinit var client: GoogleSignInClient
private lateinit var auth: FirebaseAuth

fun setGoogleLogin(){
    // 요청 정보 옵션
    val options = GoogleSignInOptions.Builder(GoogleSignInOptions.DEFAULT_SIGN_IN)
        .requestIdToken(getString(R.string.default_web_client_id))
        .requestEmail().build()
    client = GoogleSignIn.getClient(this, options)

    login_button.setOnClickListener {
        // 로그인 요청
        startActivityForResult(client.signInIntent, 1)
    }
}

override fun onActivityResult(requestCode: Int, resultCode: Int, data: Intent?) {
    super.onActivityResult(requestCode, resultCode, data)
    if (requestCode == 1) {
        val task = GoogleSignIn.getSignedInAccountFromIntent(data)
        var account: GoogleSignInAccount? = null
        try {
            account = task.getResult(ApiException::class.java)
            firebaseAuthWithGoogle(account!!.idToken)
        } catch (e: ApiException) {
            Toast.makeText(this, "Failed Google Login", Toast.LENGTH_SHORT).show()
        }
    }
}
4-2. Google 유저의 token을 사용하여 Firebase에 인증합니다.
private fun firebaseAuthWithGoogle(idToken: String?) {
    val credential = GoogleAuthProvider.getCredential(idToken, null)
    auth.signInWithCredential(credential)
        .addOnCompleteListener(this,
            OnCompleteListener<AuthResult?> { task ->
                if (task.isSuccessful) {
                    // 인증에 성공한 후, 현재 로그인된 유저의 정보를 가져올 수 있습니다.
                    val email = auth.currentUser?.email
                    ...
                }
            })
}
5. 현재 로그인된 유저 정보 가져오기
로그인 화면 외에서도 현재 구글 로그인된 유저 정보를 아래와같이 가져올 수 있습니다. [링크]
val user = FirebaseAuth.getInstance().currentUser
val email = user.email
val name = user.displayName
val photoUrl = user.photoUrl
6. 로그아웃
6-1. Firebase의 currentUser 정보를 삭제합니다.
Firebase.getInstance().signOut()

// signOut() 호출 후 currentUser을 호출하면 null이 반환됩니다.
val user = Firebase.getInstance().currentUser
6-2. Google 계정을 로그아웃합니다.
val opt = GoogleSignInOptions.Builder(GoogleSignInOptions.DEFAULT_SIGN_IN).build()
val client = GoogleSignIn.getClient(this, opt)
client.signOut()
6-3. Google 계정과 앱과의 연결을 해제합니다.
구글 계정 > 보안 > 계정 액세스 권한이 있는 타사 앱> 에서 삭제됩니다.
val opt = GoogleSignInOptions.Builder(GoogleSignInOptions.DEFAULT_SIGN_IN).build()
val client = GoogleSignIn.getClient(this, opt)
client.revokeAccess()
7. Firebase 인증된 유저 정보 확인
Firebase Console > Authentication > Users 탭에서 Firebase에 인증된 유저 정보를 확인할 수 있습니다.

참고
'개발 > Android' 카테고리의 다른 글
| [Android] Progress Dialog 만들기 (2) | 2021.08.25 |
|---|---|
| [Android] Firebase Database - Cloud Firestore 연동하기 (0) | 2021.06.08 |
| [Android] 갤러리 사진을 Firebase-Storage에 업로드하기 (0) | 2021.05.07 |
| [Android] 파일 다운로드 시, progressBar percent가 마이너스로 나오는 경우 (0) | 2021.03.18 |
| [Android] Failed resolution of: Lorg/apache/http/params/BasicHttpParams 해결 (0) | 2021.03.15 |


